Crosscut Saws
Note
This book is not anywhere close to complete. For more on its status, please see Status of this Book. Please enjoy this preview as it grows, and if you have feedback, send it to simonstl@simonstl.com.
Your first saw should probably be a saw that cuts across the grain, called a crosscut saw, or, more precisely, a crosscut handsaw. Wood comes in many sizes, but usually in long pieces. Being able to make short pieces out of long pieces is more important at first than making narrow pieces out of wide pieces.
Crosscut Blades
Crosscut saws range from tiny saws meant for modelers to huge saws used for logging. Some cut on the pull stroke, others on the push. All of them share a common foundation: knife edges that sever fibers as the saw moves across the grain.
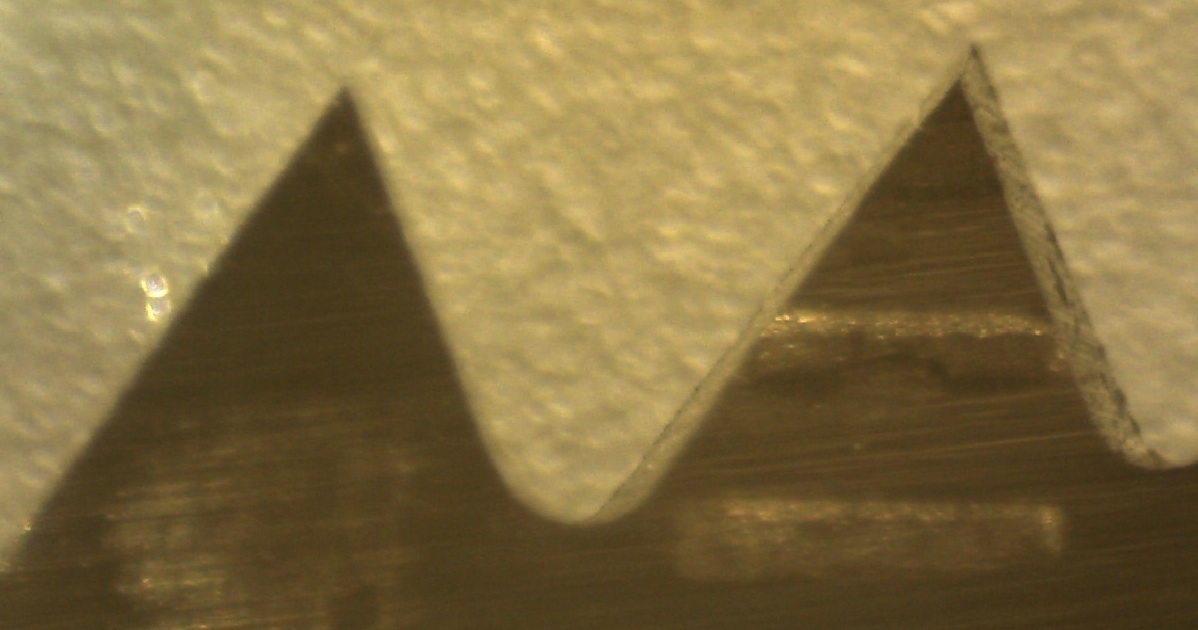
Crosscut blades aren’t quite like a knife, though - they’re more like a set of knives arranged to point the opposite way on every other tooth, as you can see in the microscope photo in Figure 5-1. This creates a small channel of sliced fibers that then become sawdust.
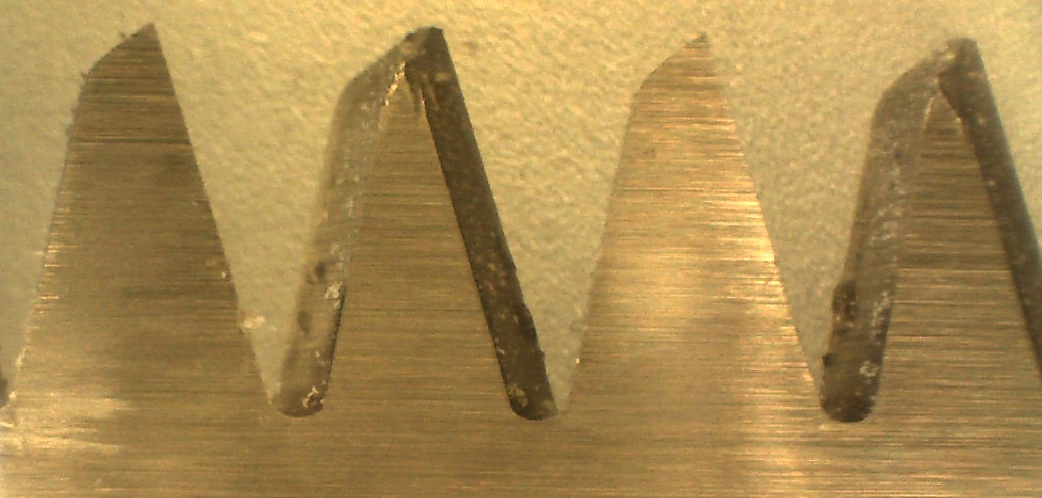
Some blades have more complex geometry, like that shown in Figure 5-2. They attempt to be prepared for multiple materials and different situations. The every-other tooth design and the knife edges make it clear, though, that this at least began as a crosscut pattern. (Many of these saws are coarsely designed generalists. They won’t do well for fine work. However, Bad Axe Toolworks offers a hybrid (and expensive) saw that’s designed for fine cuts both across the grain and with the grain.)
Whatever the precise geometry, those knife edges cut the fibers, and the resulting saw dust piles up in the gullets, the spaces between the teeth. The dust falls out when the gullets exit the wood. If the gullets fill with dust before the saw leaves the wood, cutting will become difficult and slow.
The size of the teeth makes a big difference in the speed and smoothness of the cut. Saws with fewer teeth (or points) per inch cut faster, but leave rougher edges. Saws with more cut more slower, but leave smooth edges. You can find saw blades in a broad range from about 3 per inch to 80 per inch, but for most woodworking, 7 to 16 makes sense.
Note
Sometimes you’ll see saws listed with teeth per inch, and other times with points per inch. It has to do with where you start counting, but there is always one more point per inch on a blade than there are teeth per inch. It really only makes a big difference when you’re dealing with low numbers of teeth or points.
The teeth also stick out a bit to the side, at an angle called set. Set makes the saw cut a slightly wider groove than the plate of the saw. (The horizontal marks on the blade in Figure 5-1 are probably a side-effect of how the teeth were set.) The wider groove created by set helps keep the saw from getting stuck in the cut. However, you don’t want too much or the saw will wander in the cut and leave marks on the side. A little set goes a long way!
Number of teeth in the cut. Rake. Set. As Christopher Schwarz says in his Sawing Fundamentals video, "Too much set can create drunken saw… where it’s very difficult to track the line because your saw is rattling around in the kerf."
Better saws also have a tapered plate, which is thickest at the base by the teeth and gets thinner going up from there. The tapering helps keep the saw from getting stuck in the cut, while requiring less set.
If the saw teeth are black and blue, they have been induction-hardened, using electricity to make the teeth much harder than the rest of the metal. Induction-hardened teeth will stay sharp far longer than normal teeth. However, once they stop being sharp, the saw is pretty much done. They can’t be re-sharpened unless you completely remove the induction-hardened section and cut new teeth in the saw, which is a lot of work to create a saw with soft teeth.
Blades are generally sharpened to cut on either the push or the pull stroke. Some kind of cut on both, but generally one direction or the other is better. Pulling on a push stroke saw won’t cut as well, but pushing on a pull stroke saw may bend and kink the blade. Be careful!
Note
Not everyone loves crosscut saws. For a contrary opinion, see Paul Sellers at http://paulsellers.com/2014/05/questions-answered-why-crosscut-pattern-saws-dominate-part-i/.
Choosing a Saw
As attractive as the logging saws may be, they don’t fit well in a workshop. Pruning saws may fit better, but their curves and the style of their large teeth are designed to cut the green wood of trees rather than the dry wood used for most woodworking.
To get started, you probably want a crosscut handsaw in one of three styles: a panel saw, a backsaw, or a bow saw (sometimes called a frame saw).
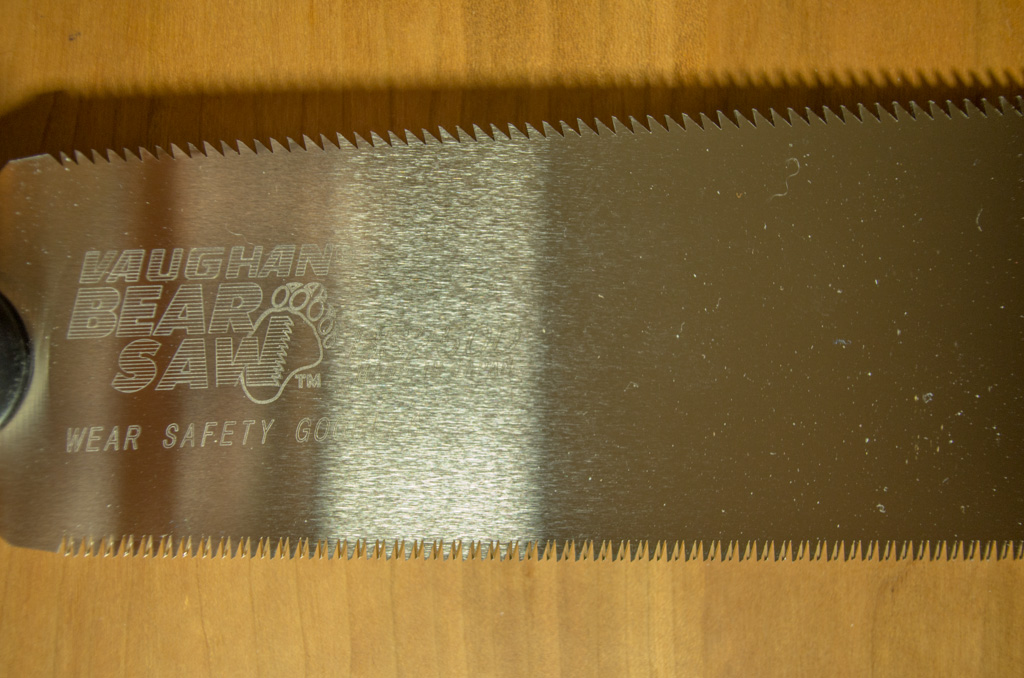
Panel saws (often just called saws or handsaws) have the classic saw shape, with an enclosed handle on one end and a blade on the edge of a large flat piece of steel. They are typically 20-26 inches long, and usually meant more for breaking down wood or carpentry than for precise final cuts. Saws that are taper-ground are thicker at the blade than at the top, which makes them less likely to get stuck (bind) in the cut.
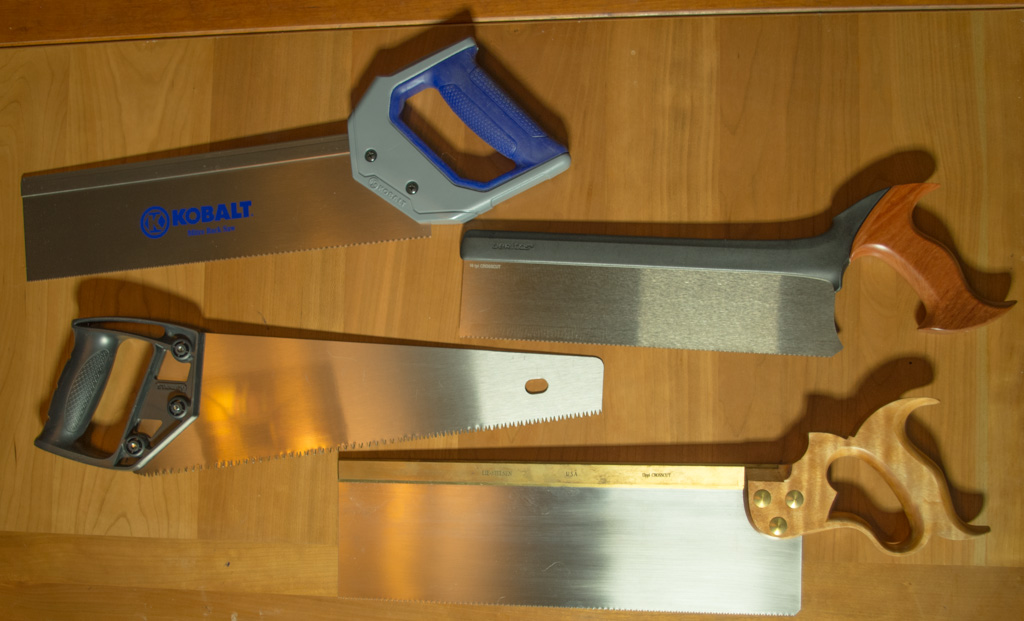
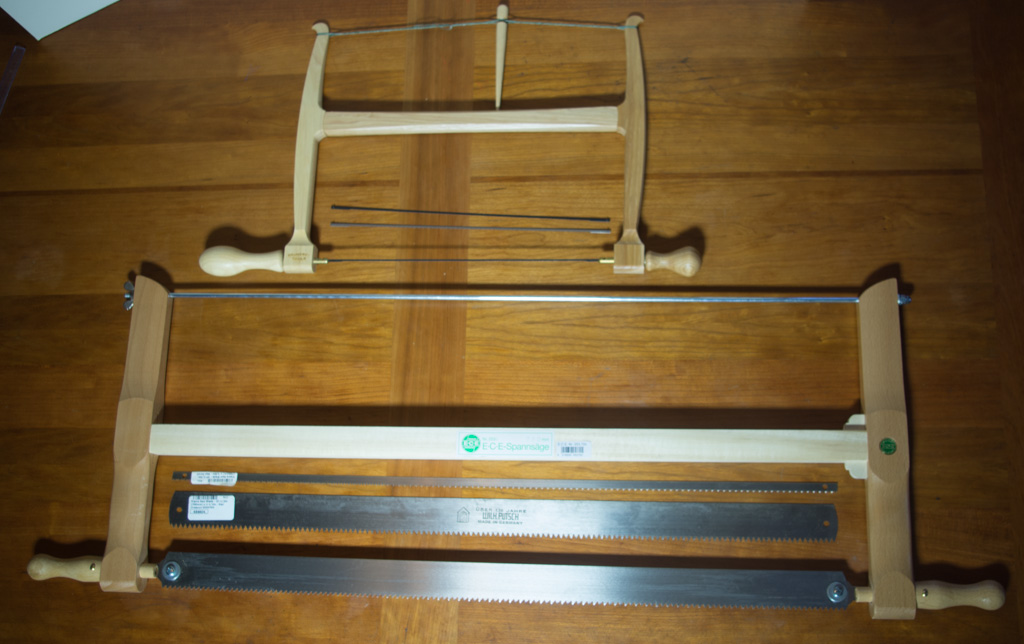
Backsaws usually have rectangular blades with a spine running along the top to stiffen the blade. The handles may be open or closed, depending on the size of the saw, and some (often called "Gent’s Saws") have round handles instead. Backsaws tend to be smaller than panel saws, though Figure 5-4 shows a range of sizes. Backsaws with crosscut teeth are often called carcase saws or tenon saws (Some tenon saws have teeth meant for ripping with the grain. Check the details!)
Bowsaws and frame saws have long and relatively thin blades, held in tension with a wooden frame. Bowsaws come in a wide range of sizes and have replaceable blades, as shown in Figure 5-5. Some, like the bigger frame saw shown, use a threaded metal rod for tension, while others like the small bow saw use string for tension. (Some people only call a saw a frame saw if the blade is in the middle. Others don’t.) These saws come in a wide range of sizes and multiple blades are usually available for different tasks. Some blades are meant primarily for cutting curves, and are narrow. Others are wider, easier to keep straight in a cut. Although the blades are replaceable, it’s not an instant switch. Unless you are very patient, you shouldn’t plan on changing blades with every cut.
Warning
The bowsaws you are likely to find in a hardware store are meant for pruning, not for woodworking. The bowsaws meant for woodworking are usually made of wood themselves. Hacksaws, which look much like the metal bowsaws, are meant for cutting metal, not wood.
The Western versions of these saws all cut on the push stroke, away from you. Saws that cut on the pull stroke, often Japanese or based on Japanese designs, are rapidly becoming more popular. They tend to be easier to start in a cut and tension themselves from the force of pulling. That makes it easier to use thinner blades for finer cuts. However, the Japanese saws are thinner and don’t have backs, so if you push them hard and they get stuck in the wood, you may bend or kink them. Saws with kinks are not much fun to use.
While Japanese saws used to be hard to find, they’re now common in hardware stores and woodworking stores alike. Dozuki saws are backsaws with one edge and may be set up for either rip or cross cuts. Ryoba saws, like the one in Figure 5-6, have two edges. Typically one side is for rip cuts and the other is for cross cuts.
If you’re interested in the Japanese saws, you might explore The problem with buying a Japanese saw, which looks at questions like which sizes of which kinds to get.
For small work, you might also consider a "razor saw". Meant mostly for modelers, these have lots of tiny teeth. They tend to start around 14 teeth per inch and go to 50 or 60. They’re smaller saws, often cheap, that make clean but slow cuts.
Note
Eventually you may also want a flush-cut saw. These are flexible saws with a crosscut pattern but no set, designed for tasks like cutting off plugs right next to the surface they’re plugging. You don’t need one of these until you have a project that calls for it.
The handle, or tote, will also become critically important as you use the saw more and more. A rough plastic handle, or even a nice wooden one that doesn’t fit your hand, can raise blisters when you use it more than occasionally. The angle of the handle against the blade can also make a big difference in how your hand transmits power to the saw. These issues will become clearer as you use saws more.
Given all of these options, where do you start? It depends on your budget and your aspirations, and to some extent on the size of wood you want to cut.
For the next few projects, you’ll likely only need the saw to create smaller pieces than you then shape with other tools. For that, a basic hardware store panel saw, like the Stanley 8-point saw shown in Figure 5-4, will do fine. Cuts won’t be smooth, but they’ll be quick. Sometimes these are induction hardened, and sometimes they aren’t. The plastic handle isn’t great, but for $15 or less, it works. You absolutely can buy nicer saws, and may eventually, but this is a tool category where starting cheap is very reasonable.
Note
You may already have a saw like this - they’re certainly common. Used saws are also often cheap. I’ve bought several for $2 each. However, unless you can try out the saw, you may find yourself buying a dull one. You might get a great saw, or you might get a surface only suitable for painting. If you want to explore, Restore a Vintage Handsaw for Everyday Use is a good place to start.
As you approach joinery, though, you’ll need something with more and smaller teeth. The miter box saw shown in Figure 5-4 may be okay - and is also around $15 - but isn’t nearly as comfortable or smooth as the other two backsaws in the picture. However, those other saws are $79 and $165, so listen to your budget. If you only want to have one crosscut saw in your collection, the Veritas 14tpi crosscut carcass saw ($79) could serve you well both for (somewhat slowly) breaking down wood up to about 2" thick and 12" wide and for finer joinery work. Veritas also makes a smaller 16tpi crosscut saw ($69) for joinery. It only cuts 1 9/16" deep, so is best for smaller cuts.
In Europe, a framesaw or bow saw may be more readily available used and a good option, but they tend to be more expensive ($70 minimum) in the United States. By the end of this book you’ll have the skills you need to build a nice framesaw, however.
Japanese saws can be a great option wherever you are. The shift to pulling has subtle effects on a lot of woodworking directions, however, so be careful to take that into account when you’re working.
Using a Saw
The basic rule of saws is that a better start will get you a better cut. Once you’ve started a kerf, the space created by the saw, it’s very very hard and often counterproductive to steer the saw. Ideally, you want your cut to start cleanly and have a simple vertical drop so that gravity will help your cut rather than hurt it.
Mark cut. Sawing on line vs. sawing on waste side of line. (Drawing the saw backwards a few times can help get the cut started.)
In The Essential Woodworker (45-6), Robert Wearing describes three kinds of cuts, and approaches for getting them right. You don’t have all the tools for these, but you will encounter them later in the book and be ready for them when you get there.
-
Wearing doesn’t describe it, but the "no class cut" is pretty much dropping the saw on the wood near the line and pushing forward (or pulling back with a pull saw) to start a cut. If you don’t care at all about precision or appearance, this might be fine. It’s certainly quick.
-
The third class cut is a cut that needs to be in right place but doesn’t need to be pretty. Rough edges are fine. Draw a line across the wood, on two edges. Put the saw on the line or the waste side of the line, and use the thumbnail of the hand that isn’t driving the saw to steady it while pulling back a few times. Once you have a kerf established on the front corner, saw gently until the kerf goes all the way across the wood.
-
The second class cut needs to be accurate, but doesn’t need to be perfectly neat. It’s for cuts that aren’t visible. Instead of a pencil, use a marking knife (see ???) to draw the line, and then use a chisel (see ???) to make a small nick on the waste side of the line. If you’re using a push saw, the nick goes on the side far away from you. If you’re using a pull saw, the nick goes on the side facing you. The nick will make it much easier to get the saw started, and the marking knife cut will help guide the saw straight as well.
-
The first class cut is for joint edges that will be visible in the finished piece. Setup is similar to the second class cut, but instead of creating a nick, you create a groove across the entire marked line. A wide chisel cutting gently from the waste side into a deep line created with a marking knife will get you started right.
For now, third class cuts should be fine. As you move further into joinery, you’ll need the first two classes of cuts more and more. They take more time to start, of course, but they’ll save you time and material in the long run by avoiding trouble.
Step through a third-class cut.
Stance, grip on tote
Practicing - destroy some wood!
For careful work, start one line at a time. Establish square (or angle) early. Get longest (or most important) line right first when possible. Don’t spend all day chiseling a channel into the wood, though.
Okay to pull saw back into cut, just don’t let it drop out the back.
Shooting board, eventually.
Horiz vs vertical wood - take advantage of saw wanting to be straight.
Lifting saw a bit on not-cutting stroke - sound like breathing, intake, outtake
Starting shallow, then adjusting to define kerf or work at best angle for saw. Moving work during cut for different angles and such.
Keeping a crosscut saw in your car.
Dreams
Miter saws
Jointmaker Pro