Sandpaper
Note
This book is not anywhere close to complete. For more on its status, please see Status of this Book. Please enjoy this preview as it grows, and if you have feedback, send it to simonstl@simonstl.com.
Sandpaper? Isn’t that the newfangled material power tool users apply to hide their machine marks?
As John Ruskin wrote in The Stones of Venice, "never imagine there is reason to be proud of anything that may be accomplished by patience and sandpaper" ("The Nature of Gothic", XIX). Most of my memories of middle school wood shop were of endless sanding, producing little of which I’m proud.
Part of the joy of using hand tools is that you should be able to minimize your use of sandpaper. Later, you’ll encounter tools like hand planes that let you do much less sanding on large flat surfaces.
Sandpaper should be part of your toolkit, though. It has a long history, though, from natural materials like scouring rush (a plant, really!), pumice, rottenstone, and glasspaper to today’s modern marvels. Smooth surfaces feel good and look nice. Sanding requires relatively little skill. It is often treated by experts as an inferior approach, but it remains useful for cases where planes don’t work, like small and irregular objects. Often, it provides a critical finishing touch.
Note
As you’ll see in Sharpening and Maintenance Basics, sometimes you need to combine patience, abrasives, and a bit of skill to make tools that help you create good work.
Choosing Sandpaper
You don’t need to buy extremely expensive sandpaper, but you don’t need to hunt for the bargain basement stuff either. A few dollars worth of decent sandpaper should be enough to keep you sanding through a lot of handmade projects. (The glue in the cheapest sandpaper may not hold the abrasive on the paper for long.)
So what is decent sandpaper for woodworking? Most of the time you’ll be working with aluminum oxide or garnet sandpaper. Aluminum oxide crystals have sharp edges that break off to reveal new edges. This property, called friability, keeps the sandpaper working longer.
Note
Friability also means that small bits of aluminum oxide get worked into your wood, making the wood a bit more abrasive on tools that come later, dulling them faster. That doesn’t matter very much if sandpaper is your last tool, and it doesn’t seem to bother very many people.
Some kinds of garnet are friable, but not enough to make a difference in sandpaper. When the edges of the garnet crystals get dull, the sandpaper cuts less. You’ll have to replace the sandpaper more often. However, many woodworkers prefer the smoother finish garnet leaves, so it can be a good tradeoff.
For wood, you want the sandpaper to have and open coat, with the crystals spread across the paper leaving room for sawdust. You don’t need stearated, wet-dry, or cloth-backed sandpaper. They aren’t necessary for wood. (Adhesive backing may or may not be useful to you.)
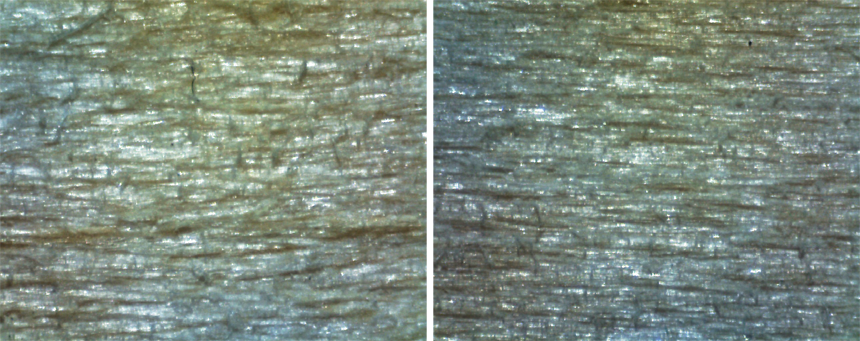
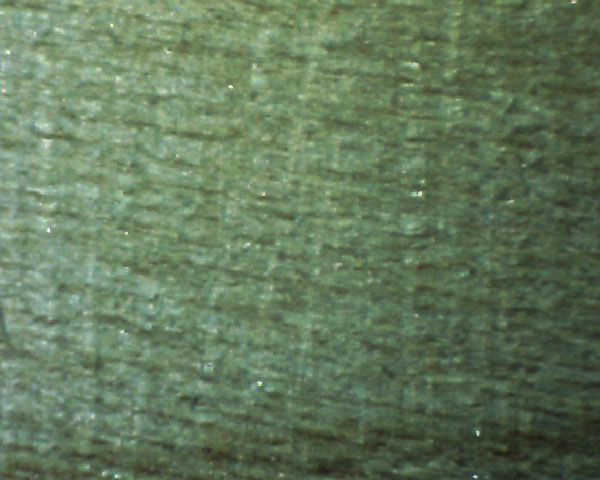
Aluminum oxide and garnet sandpapers look pretty different, as the close-up views in Figure 3-1 and Figure 3-2 demonstrate. The chunks of garnet are smaller and more scattered.
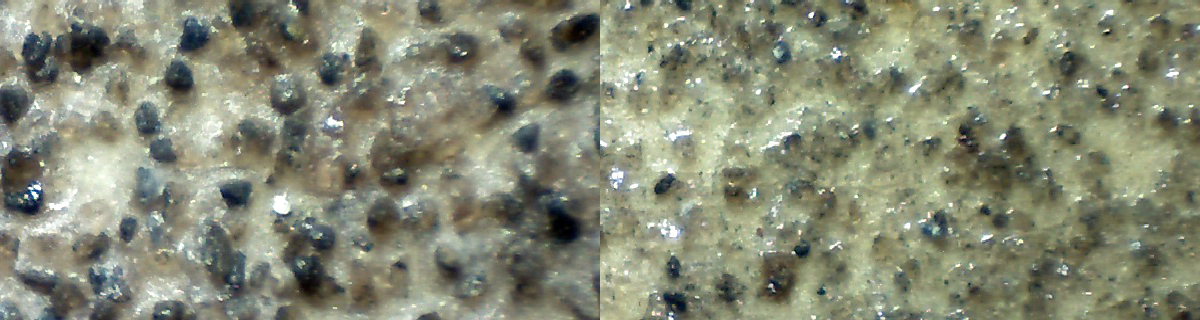
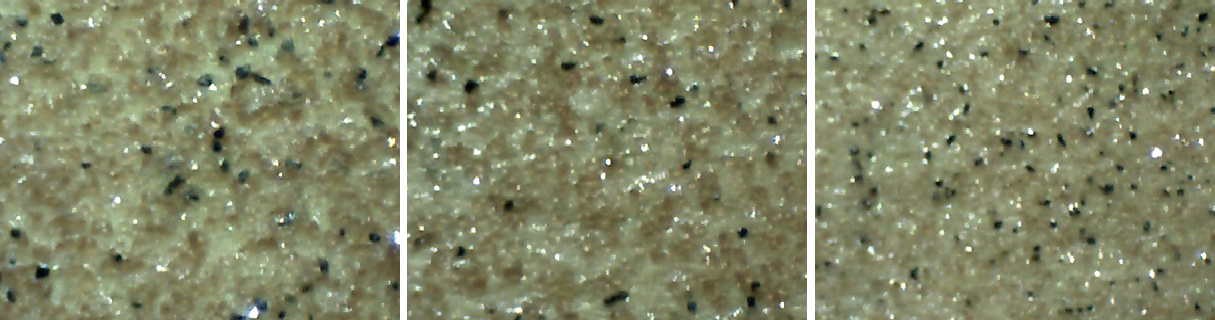
You can use either aluminum oxide or garnet. I tend to use garnet. Typical (3M) sandpaper marked "for wood" is garnet.
Sandpaper works best when it has something behind it, to keep it flat against the surface being sanded. You can use your fingers (and sometimes there may not be an alternative), but sanding blocks generally yield smoother results. Figure 3-3 shows a variety of different commercial sanding blocks, including a simple rectangle of foam, a block that holds the sandpaper tightly in place, a stick sander for getting into tight spots, and sanding grips designed to get into concave and convex curves.
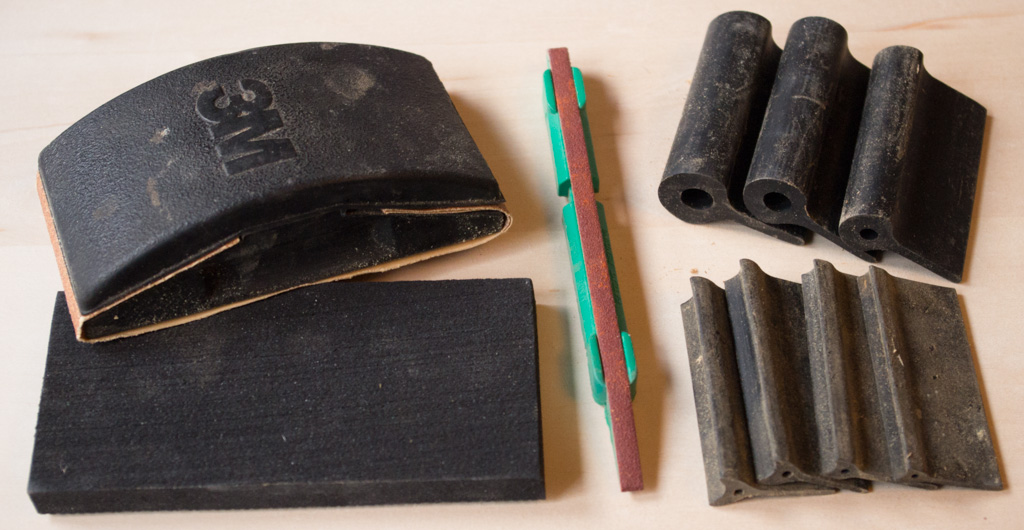
Getting everything shown in that picture would cost about $30. Don’t spend that money until you need the parts, though! Starting out, a block of wood and some tape will do fine. Adhesive cork sheet between the wood and the sandpaper could make it nicer. The larger sanding block shown in Figure 3-3 is also an easy place to start, and should set you back $5 or less.
Note
You can find fancier blocks with features like hook-and-loop (think Velcro) fasteners for pre-cut sheets of sandpaper, which may be convenient if you already have sandpaper for machine sanders around that is the same size. They spare you some fiddling with sandpaper, but also demand more of your wallet.
Stores carry all kinds of sanding devices, with new ones appearing constantly. While they mostly all work, you don’t need to try them all. Sandpaper backed by a block will get you started, and blocks you make to creative shapes can get you out of odd situations as well.
Occasionally you’ll find a place you need to sand that can’t be reached with a sanding block. Holding paper, or better, a cloth band, taut may let you reach into spots you can’t otherwise reach. Long rolls of cloth-backed sandpaper are sold for use by woodturners, or you can buy a belt meant for a power sander. Figure 3-4 shows sanding inside a narrow groove with a belt from a 3x18 belt sander. I cut the belt at the join and widened the groove by sanding inside it.
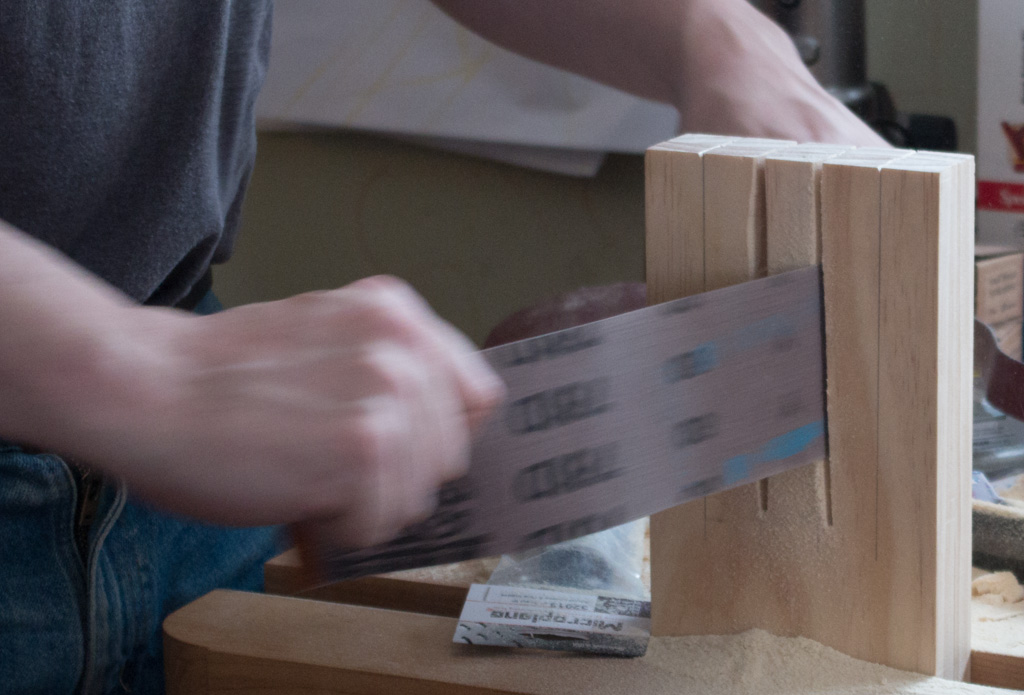
It’s not my favorite approach, but occasionally it’s convenient despite the dust and mess.
Warning
Steel wool is also an abrasive, but don’t use it on bare wood. Bits of the the steel threads can get caught in the wood fiber and rust later, making a mess. Fine steel wool is great to have around to knock down sharp edges on tools (where they aren’t supposed to be sharp!) and for smoothing out some kinds of finishes.
Sanding
Sanding pretty much means rubbing sandpaper on wood. Each time you rub the paper on the wood, the grit cuts small grooves in the wood surface. Depending on how smooth the wood is to begin with, you work your way from coarse to smooth.
Later in the book, when you’ve been smoothing the wood with handplanes and scrapers, you can probably just use 220 grit sandpaper and nothing else. Before you get to those tools, though, you’ll probably want to work through 100 and 150 before reaching 220. (You can go to 320 or even 400 if you really want, though it matters less.) Sanding works better when you go from coarse to smooth, and don’t skip grits. A close look at the wood, shown in Figure 3-5, shows how the wood becomes more regular.
The scratches are smoother, smaller, and more regular. The wood had its own lines (called grain) at the start. Sanding in the same direction as those lines makes it not only smoother but neater looking.
Warning
Hand sanding produces far less sawdust than machine sanding, but it is still dust. If you find yourself sneezing or coughing after sanding, consider a dust mask. Wood may be all natural, but people can have (or develop) allergies to natural materials. For some reason pine makes me sneezy, even if I’m just transporting it in the car. Some tropical woods in particular can produce strong reactions. Odds are low that any of this will happen to you, but if you notice a pattern, adjust the way you work and maybe the woods you work.
You can sand across the grain, but the scratches will contrast with the wood as shown in Figure 3-6. These scratches will also be harder to remove. Sanding across the grain removes material more quickly, but you’ll need to spend time smoothing it back.
For most of the projects in the next few chapters, you should have open coat sandpaper (garnet or aluminum oxide) in grits 100, 150, and 220. (80, 120, and 180 grit are also sometimes available, but you don’t need to work through that many grits.) You should mount it to a sanding block, and sand with the grain until the wood stops getting smoother. When you finish with a grit, move to the next grit, or call it complete.
Note
Some woodworkers, notably Robert Wearing in The Essential Woodworker, warn against using other tools on wood once it’s been sanded. The argument is that some particles of the sandpaper will fall off and get embedded in the wood. Then, when you apply metal tools to them, those particles dull the edge. I haven’t noticed this, but I usually apply sandpaper to surfaces only at the very end.
Dreams
Someday when you’re making projects with a finish aiming for a particular gloss (or lack of gloss), you may encounter different kinds of sandpaper and abrasives. All of it is different from the sandpaper you need to work with wood.
Some kinds of wood (like mahogany, oak, and ash) have large noticeable pores. A simple finish over them makes the pores more noticeable, which some people like. If it’s not to your taste, you can apply several coats of a brittle finish (not wax, oil, or varnish) and sand to cut back the finish between coats. The sandpaper for that typically starts at 220 grit and works its way up to 600, and is wet/dry or stearated (with a lubricant built in). You can go further, through rubbing compounds like pumice (ground lava), rottenstone (ground limestone), or other compounds sold for the purpose.
Note
Auto parts stores usually have a lot of rubbing compound options, to create the high-gloss finish people expect of cars. Sanding makes cars shinier.
French polishing is a classic handmade finish padding shellac onto the wood. When doing that, you can fill the pores by using the pad with just alcohol and pumice to gently abrade some wood into dust, which then settles into the pores.
A completely different abrasive, fine steel wool, may be useful if you want to create a smooth satin finish rather than a glossy one.
Going the opposite direction, you can also use abrasives to remove old finish when refinishing. I was a big fan of 36 grit sandpaper when I was stripping the old finish off my floors, but milder abrasives can be useful in refinishing furniture and other objects.