This book is not anywhere close to complete. For more on its status, please see Status of this Book. Please enjoy this preview as it grows, and if you have feedback, send it to simonstl@simonstl.com.
Unless you maintain and sharpen them, hand tools can rapidly turn into "tool-shaped objects", useful only for decoration. Many metal tools need sharpening, and nearly all of them need protection against rust.
Sharpening is a big subject, with several books available. I’ve enjoyed and learned from Ron Hock’sThe Perfect Edge and Leonard Lee’s The Complete Guide to Sharpening, but there are several others as well.
Even without buying a whole book on the subject, you should be able to sharpen simple blades - knives, chisels, and plane blades - fairly quickly. More complex tools are possible, but will require some special training. Some saws, as noted earlier in the book, are meant to be disposable rather than sharpened. Coping saw blades don’t last forever, and induction-hardened saw blades, the ones with the dark or rainbow color on the sharp edge, will last but can’t be sharpened with normal tools. For now, let someone else sharpen your saws, don’t worry about the rasps, and focus on the simpler blades with straight edges.
Varieties of Steel
Like wood, tool steel comes in many varieties. Different steels are good for different situations. Woodworkers dream of tools that hold their sharpness for a long time but are easy to sharpen.
The simplest way to evaluate tool steel is through hardness. In general, the harder the steel, the longer the sharp edge lasts, but the harder it is to sharpen. Saw blades tend to be the softest steel you’ll normally use. (Unless, of course, they’ve been induction hardened, in which case you’re unlikely ever to sharpen them.) Scrapers, often made from old saw blades, are often also in that softest category, though some scrapers are harder. Chisels and plane blades are harder than saw blades. Japanese chisels, which are laminated, generally use even harder steel for the sharp edge that contacts the wood. Files, which are often used to sharpen other tools, tend to be harder yet.
Hardness isn’t a magic solution to hand tools, though. Hard tools are brittle tools, more prone to chipping and breaking. Edges can be a challenge too. Carbide, commonly used in power tools, keeps a sharp edge for a long time but it’s not as sharp as edge as you can get with steel. You also pretty much have to use diamond sharpeners to re-sharpen carbide. (Steel alloys contain some carbide crystals, but carbide itself doesn’t contain iron, so isn’t steel.)
While steel is a combination of iron and carbon, other elements like tungsten, manganese, chrome, and vanadium also turn up in tool steels. Different makers have different recipes for both the metal ingredients in the tool and its processing, using heating and cooling to change the crystal structure of the metal. While you can’t see the crystal structure without a microscope, you may feel the difference when sharpening the tool. (Chapter 2 of The Perfect Edge includes a great explanation of how the different crystal structures form and behave, and why choosing steel involves trade-offs.)
If you buy used tools, you may not know what kind of steel you’re getting. However, many tool vendors now specify which steel is used or the ingredients in the alloys. The most common modern steels used for hand tools are O1 and A2. O1 is easier to sharpen to a finer edge, but needs more frequent sharpening. A2 needs less sharpening, but takes a lot more patience when it’s time to sharpen. My experience reflects that.
Note
Veritas claims that its new PM-V11 alloy has the advantages of both easy sharpening like O1 and edge life like A2. I’ve heard good things, but haven’t had PM-V11 long enough to know how it works for me.
High Speed Steel (HSS) alloys are harder than many others, but their primary benefit is that they keep their hardness at high temperatures, something that isn’t likely to be an issue for hand tools. Because of the alloys used to make it, crystals in the steel are larger, making it harder to sharpen to a fine edge.
Some woodworking tools are available in stainless steel, which means a fair amount of chromium in the alloy. Many knives, which are meant to be carried, are made of stainless steel, and I also have some stainless steel rasps. Unless you’re working by the ocean or in a wet environment, there’s little reason to seek out stainless.
Maintenance
The first rule of maintenance is prevention: store your tools in a dry place, and make sure they’re clean. Sawdust and shavings will absorb moisture and hold it close to your blades. The leavings of passing mice can pit your tools quickly, and if you’re near saltwater you need to be extra careful to check on your tools regularly.
Stores offer many different ways to keep your tools from rusting. Silica gel containers can absorb moisture, and then you bake them to drive out the moisture and use them again. Papers and plastic bags containing rust-prevention compounds can wrap your tools in protective vapors, at least for a while. Sprays and waxes will keep your tools shiny, so long as you stay away from wax meant for cars - it contains silicone. Your tools will be shiny, but silicone can move from your tools to your wood, interfering with finishes and leaving "fish eyes".
One of the simplest coatings you can apply to your tools is a bit of oil - jojoba and camellia are traditional options, but other vegetable oils can work. Lard probably works too, but the fragrance may cause other problems.
You shouldn’t have to tune your hand tools on a regular basis. If you buy used tools, they may need a careful cleaning and tuning at first - for a detailed explanation of what that can look like for one kind of tool, see Christopher Schwarz's video How to Super-Tune a Hand Plane. If you buy quality new tools, you shouldn’t have to do much tuning beyond sharpening it to your liking.
Just as you will need tools to do coarse, medium, and fine work as you work with wood, you will need abrasives for grinding (coarse), honing (medium), and polishing (fine) your tools. Grinding shapes the edge. Honing sharpens it. Polishing, apart from making it shiny, makes the edge smoother and longer-lasting.
Some tools, like axes, typically only get ground, while others (most workbench tools) see occasional grinding when first set up or after an accident. Most workbench tools need honing. Polishing is an extra step that may add to the life of your sharp edges, but is only really common for knives, gouges, and similar carving tools. Those tools benefit most from regular mild sharpening with fine abrasives and will leave cleaner surfaces behind when really polished.
Effective sharpening will require having coarse, medium, and fine abrasives. You may have multiple medium or fine steps and corresponding abrasives, depending on the approach you choose. Hopefully you’ll only need coarse occasionally, for example if you have to reshape a damaged blade or flatten a blade. (Used tools often need such fixing.) Most of the time you’ll only use medium and fine.
Sharpening Systems
There are several different ways to sharpen your tools. A classic system used a giant grinding wheel in water for shaping followed by an oilstone or several for honing or polishing, but that’s unusual today.
While you can buy mechanized sharpening systems, and they work, you don’t need to get one for the tools and projects in this book. Other approaches are simpler and saner to make your tools work for this book, and honing can give your tools a polished edge if you want it:
Sandpaper
Sandpaper is the cheapest system to start with, though the most expensive over the long run. By attaching sandpaper to a flat (often glass or stone) surface, you can create a sharpening surface that will get you started quickly.
Oilstones
Oilstones, especially large and fine oilstones, are a bigger investment than sandpaper. They need oil for lubrication and sharpen more slowly than sandpaper or waterstones. The oil also helps prevent rust.
Waterstones
Waterstones are usually more expensive to start with, though costs for synthetic stones are often comparable with oilstones. They’re also messy, requiring you to soak or spray them with water, and dry your blades after sharpening. Waterstones sharpen tools faster than oilstones, but need more regular flattening as well.
Ceramic stones
Some ceramic stones don’t require oil or water, which makes them conveniently portable. However, they tend to be small and used primarily for knives. They require occasional maintenance with scouring powder to refresh their surfaces.
Diamond stones
These aren’t exactly stones, but rather flat surfaces with tiny diamonds embedded in the surface. A recent addition to woodworking, they seem most popular for sharpening knives and flattening other kinds of stones.
Carbide sharpeners
Carbide is much harder than steel, but tends to come in rods and similar shapes rather than flat plates. These mostly get used for garden tools and kitchen knives, but carbide burnishers are useful for putting a hook on the edges of scrapers, as described in ???.
Strops
A strop can help you get or renew a really sharp edge. This is especially important for carving tools, and honing is often all that is done to a knife unless you damage the edge. Gouges often benefit from honing as well.
In addition, for tools that need a lot of work, a grinder may be useful. You can find hand-cranked ones used, or electrical ones new and used. If you get a grinder, look for stones designed to reduce the odds of overheating your tools. (The basic gray wheels can be a problem, and white, pink, and blue wheels make better promises.)
Note
Files can sharpen tools that combine softer steel with irregular or curved edges, like axes, saws, and floats. If you want to explore that, get a book or video dedicated to sharpening those tools.
Whatever system you choose, it’s probably best to pick one and stay with it. Sandpaper is a good choice to get started even if you’re not sure about the long run because it’s cheaper. However, collecting multiple sharpening systems gets expensive very quickly, as I’ve learned while writing this appendix.
The cheapest medium to start with is sandpaper. When you work wood with sandpaper, you usually bring the sandpaper to the wood and move the sandpaper over the wood. You want a smooth surface, but often also want soft edges. When you sharpen metal with sandpaper, you want the sandpaper perfectly flat and still. You move the metal over the sandpaper carefully to ensure consistent straight edges.
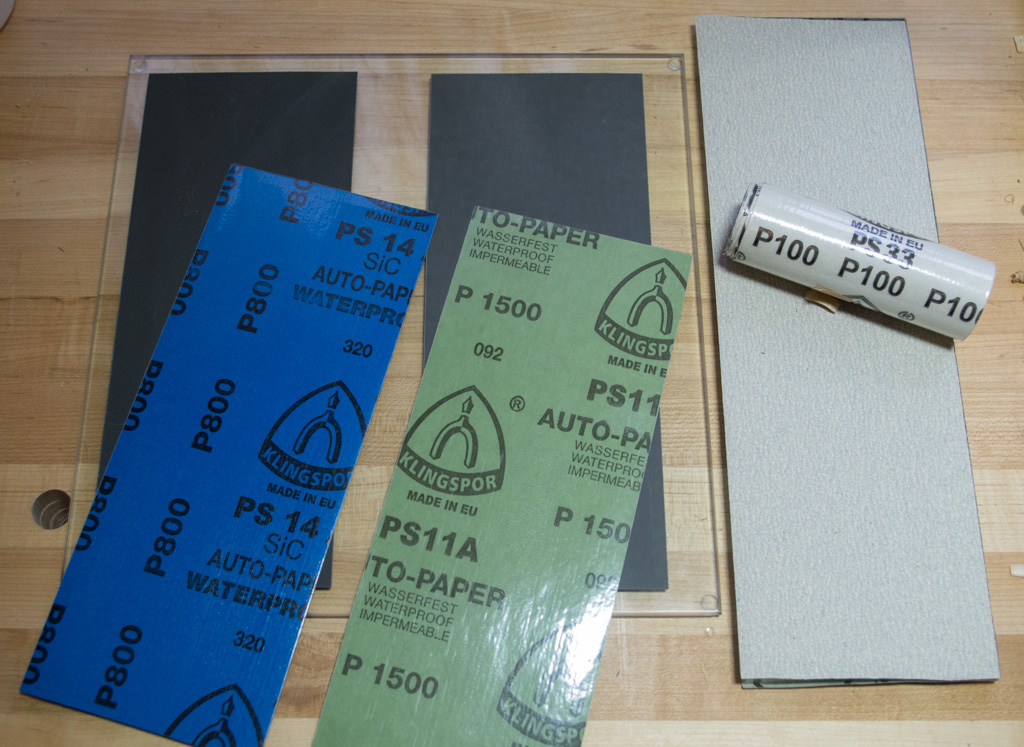
Rockler and Garrett Wade both offer sandpaper sharpening kits combining sandpaper with different kinds of flat glass. If those kits seem too expensive, you can create the same kind of thing with fine sandpaper and a base. The base might be wood (though that isn’t likely to be or stay flat), a sheet of glass, or a piece of flat stone. Granite tiles can work, as can (for a higher price) the flat granite blocks used by machinists. Figure 2-1 shows two different sandpaper setups.
Figure 2-1. Rockler tempered glass, and GarrettWade float glass as a base for sandpaper.
You’ll need a few different grades of sandpaper to get coarse, medium, and fine.
Warning
Getting the sandpaper on the glass is pretty easy. Getting the sandpaper off cleanly when it’s warn out can be trickier. Make sure you scrape off any leftover bits of adhesive before putting down new sandpaper.
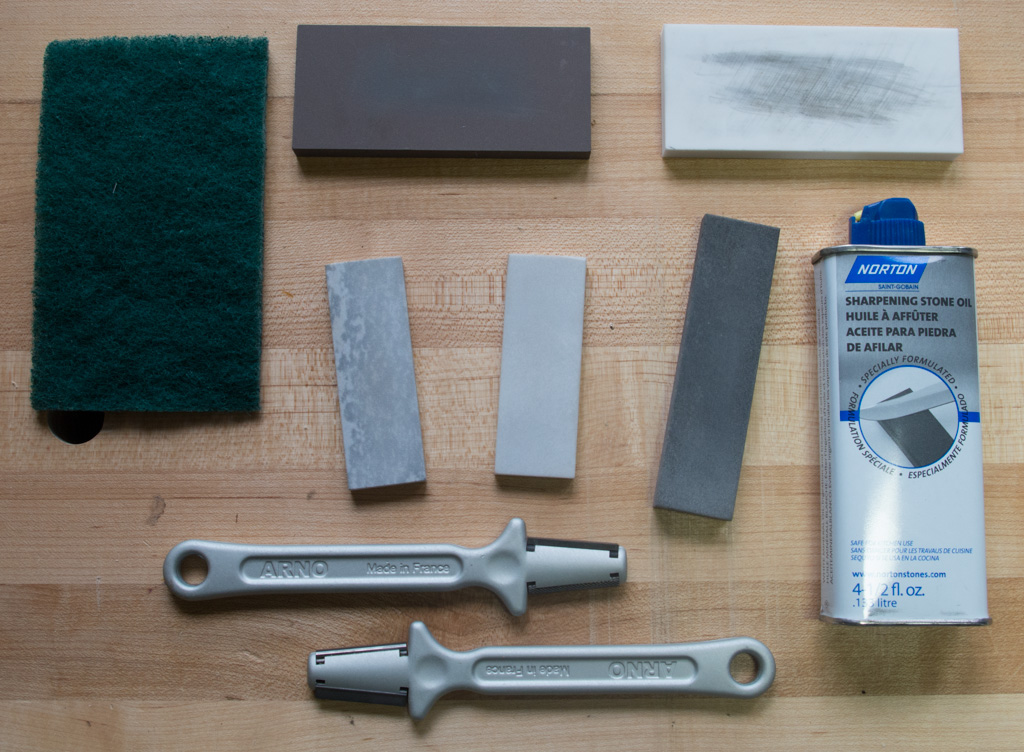
Figure 2-2. Oilstones and oil (center), ceramic stones (top, with a Scotch-Brite pad top left for cleaning), and carbide sharpeners (bottom) for sharpening knives.
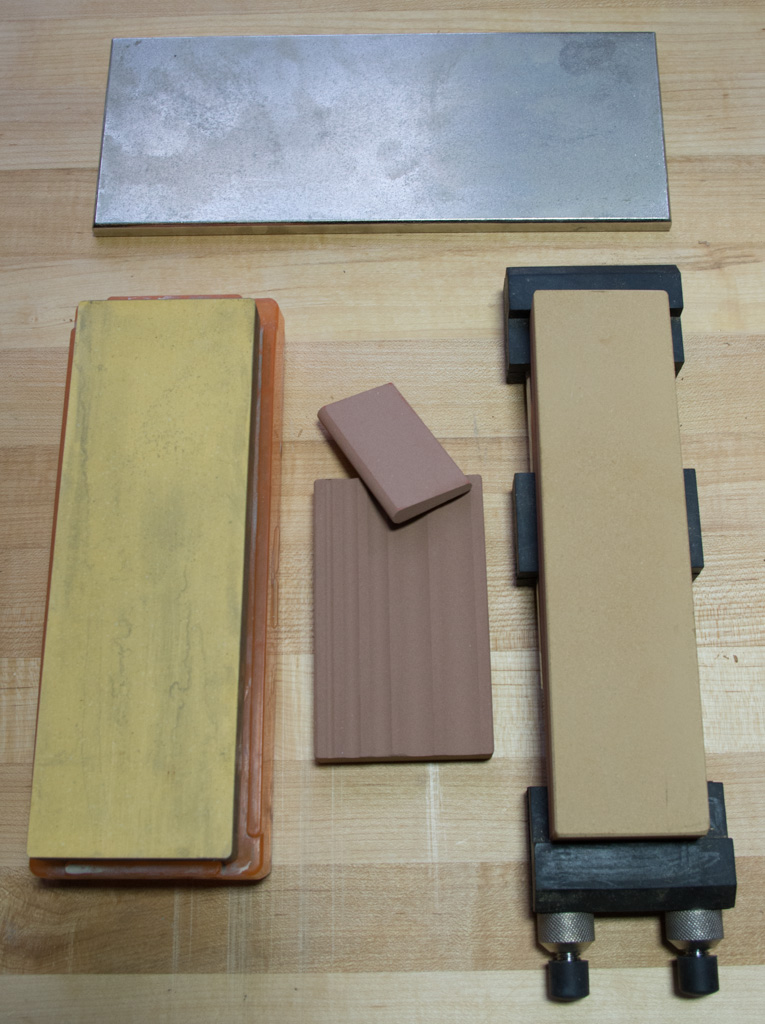
The classic image of sharpening is the huge whetstone turned by an apprentice while another person sharpens a blade against it. You can still find an antique, perhaps, but it’s usually easier to buy and use flat waterstones like those in Figure 2-3.
Figure 2-3. A variety of waterstones and a diamond stone for flattening them.
I’ve always thought of the leather strop as a barber’s tool, used to give straight razors a keen edge. Barbers’ strops are usually just a piece of leather, relying on silica already in the leather to act as a fine abrasive on the razor.
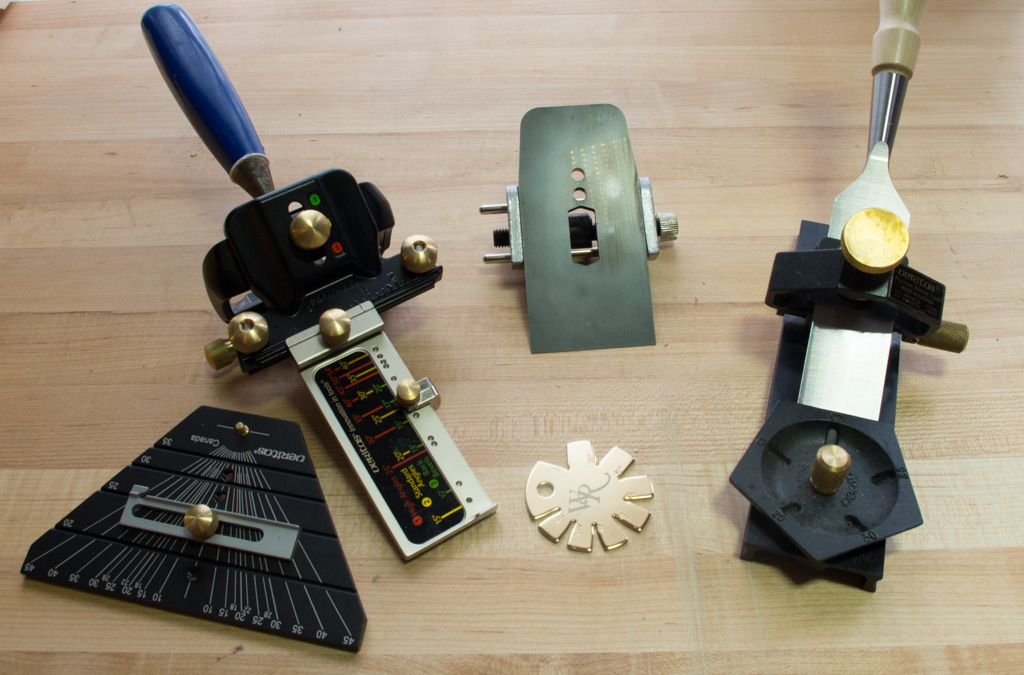
Strops for sharpening woodworking tools often include leather, but can be wooden. Honing compounds applied to their surfaces accelerate the sharpening process, though honing remains a very gentle process for final polish. undefined '2-40' shows a few different styles of strops in a variety of shapes and sizes. Strops with round surfaces are primarily for gouges, and flat strops for creating straight sharp edges.
Files are abrasive too, but not typically used like these for sharpening…
Sharpening in the round - grinders, manual and electric, and hollow-ground blades.
Sharpening Knives
Challenges of different shapes
Sharpening Gouges
Sharpening vs. commissioning.
Definitely recommend video for this one.
Wrist rotates, elbows locked, body sways
Sharpening Flat Blades
Compared to sharpening gouges, sharpening flat blades is much simpler geometry.